This page may contain affiliate links.
Read our disclosure and privacy policy here.
Creating a plaster cast of animal tracks is a fun and educational DIY project for kids. It allows them to explore the outdoors, learn about different animals, and create lasting souvenirs of their discoveries. This hands-on activity helps children develop observation skills and an appreciation for nature while making memorable and interesting keepsakes.
Table of Contents
How to Make A Cool Plaster Cast of Animal Tracks with Your Kids

Wildlife Pond Materials & Tools List
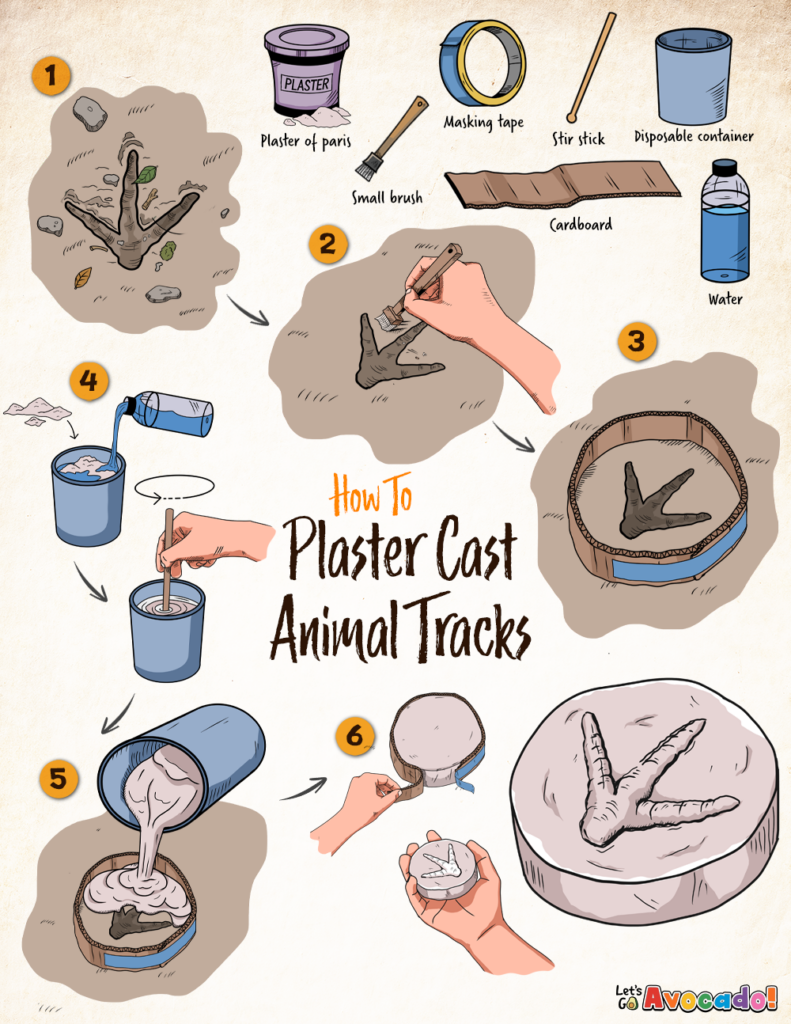
Materials Required
- Plaster of Paris
- Paintbrush (to clean the track in the mud)
- Masking Tape
- A strip of cardboard about 1 to 2 feet long
- A stick to sir the plaster of paris
- A container to mix the plaster of paris with water
- A jug of clean water to mix with the plaster of paris.
Recommended Tools
- You don’t need any special tools for this project!
Step 1: Find an Animal Track

To being your project of creating a plaster cast of animal tracks, you’ll need to find a clear animal track in the mud. Look for a print that’s well-defined and not too dry.
Step 2: Prepare the Track

Gently brush away debris from the track with a small brush or old toothbrush. Be careful not to disturb the track itself.
Step 3: Create a Mold Barrier

Place a piece of cardboard around the track. If using, secure the cardboard in place by gently pushing it into the mud or securing it with tape or rubber bands.
Step 4: Mix the Plaster

In your disposable container, mix Plaster of Paris with water according to package instructions. Stir until smooth.
Step 5: Pour the Plaster

Gently pour the mixed plaster into the mold, ensuring the track is completely covered. Avoid pouring too quickly to prevent the plaster from overflowing or the track from being disturbed.
Step 6: Let it Set and Remove

Wait for the plaster to harden according to package instructions, usually about 30 minutes. Carefully remove the cardboard and lift the plaster cast from the mud. Creating a good plaster cast of animal tracks take patience, do not try to rush things and remove the plaster too early or it may ruin the cast!
You're Done!

Congratulations, you’ve successfully cast animal tracks in plaster! This project gives you a unique way to learn about the animals that visit your area and create lasting souvenirs of your outdoor adventures.
Now that your plaster casts are dry, you can display them at home or take them to school to share with friends. Look closely at the details of the tracks and try to identify the animals that made them. You might see the tracks of birds, raccoons, deer, or even something more unusual!
Keep an eye out for more animal tracks whenever you go outside. Each new set of tracks is an opportunity to make another plaster cast and learn more about the wildlife around you. You could even start a collection! Remember to always respect nature by leaving the environment as you found it. Enjoy your plaster casting adventures and have fun discovering the amazing world of animal tracks!
Engaging Discussion Topics about creating a plaster cast of animal tracks
Casting animal tracks in plaster is a fantastic way for kids to connect with nature, learn about wildlife, and develop hands-on skills. As you work on this project together, here are some engaging discussion topics to enhance the learning experience and make the activity even more enjoyable.
Types of Tracks to Cast
Questions to ask: What kinds of tracks do you think are easiest to cast? Why might some tracks be more challenging to cast than others?
Discussion points: Discuss different types of animal tracks, such as those from birds, deer, raccoons, and small mammals. Talk about the size, depth, and detail of the tracks and how these factors affect the casting process. Explain that larger, clearer tracks are usually easier to cast.
Best Surfaces for Finding Tracks
Questions to ask: Where do you think we can find the best tracks to cast? Is it easier to find tracks in mud, wet mud, or snow?
Discussion points: Discuss the differences between finding tracks in various conditions, such as mud, wet mud, and snow. Explain that wet mud often holds the best details, while snow can be tricky because it can melt or collapse. Talk about how different surfaces can affect the quality of the plaster cast.
Preserving Tracks in Other Ways
Questions to ask: Can you think of other ways to preserve animal tracks besides plaster casting? What might be some advantages or disadvantages of these methods?
Discussion points: Explore other methods of preserving tracks, such as taking photographs, making drawings, or using clay impressions. Discuss the benefits of each method, such as the ease of taking photos or the durability of clay impressions. Explain that plaster casts provide a three-dimensional and permanent record.
Identifying Animal Tracks
Questions to ask: How can we identify the animals that made these tracks? What clues should we look for in the tracks?
Discussion points: Talk about the different features of tracks, such as size, shape, and number of toes, that help identify the animal. Discuss how to use a field guide or an app to match tracks to animals. Encourage kids to observe other clues around the tracks, like fur, feathers, or droppings.
Observing and Respecting Nature
Questions to ask: Why is it important to observe animal tracks without disturbing nature? How can we make sure we’re being respectful while casting tracks?
Discussion points: Emphasize the importance of leaving no trace and respecting wildlife habitats. Discuss ways to minimize impact, such as being gentle while handling tracks and returning any disturbed materials to their original state. Explain that respecting nature ensures that animals can continue to live safely and comfortably in their habitats.

There’s a lot to explore right where we are, in our own neighborhoods and backyards! Join us while we get off the couch and explore the everyday wonders of nature, science, space, engineering, art, and anything else we stumble upon during on our adventures.


